| Mk4 has been announced, and we need to talk about what it means for the future of this website.
Please join the discussion either on the WMU Facebook Group or the Talk:Main Page area of this wiki.
|
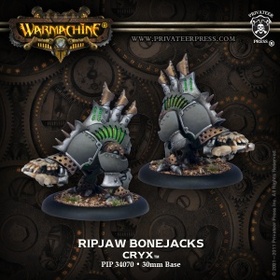
The Ripjaw’s pincer-like jaws are used to hold its victims in place while its bone saw cuts them into mangled and unidentifiable bits. Necrotechs take particular delight in using the Ripjaw, as the ’jack efficiently dismembers its victims into component pieces. Regardless of these lethal armaments, the Ripjaw remains quick and agile like its brethren and serves its master by maneuvering its arc node to wherever required to disrupt the plans of the enemies of Cryx.
|
|

|
When you go to physically buy Ripjaws, you get a box with 2 models. Despite this, they are added to your army one model at a time.
|
|
Basic Info
| Ripjaw |
| Missing Info |
|
|
| COST |
{{{cacost}}} |
| UNIT SIZE |
{{{casize}}} |
| FA |
{{{cafa}}} |
| Warcaster 0 |
| BASE |
Medium |
| SPD |
7 |
| STR |
7 |
| MAT |
5 |
| RAT |
N/A |
| M.A. |
N/A |
| DEF |
14 |
| ARM |
14 |
| CMD |
N/A |
| ESSENCE |
{{{essence}}} |
| FOCUS |
N/A |
| FURY |
N/A |
| THRS |
N/A |
| HP |
20 |
| F. Field |
N/A |
|
|
|
|
| WJP |
{{{wjp}}} |
| WBP |
{{{wbp}}} |
| IHP |
{{{ihp}}} |
| FA |
U |
| UNIT SIZE |
N/A |
| COST |
6 |
| N/A |
| N/A |
|
|
|
|
| N/A |
| Warcaster 1 |
| COST |
N/A |
| N/A |
Understanding
the Statblock |
|
Warjack - All warjacks share the same set of special rules. Most notably being big and stompy. Click here for a newbie-friendly recap, or click here for the full rules.
Abilities
Weapons
|
|
|
|
|
|
|
|
|
|
|
|
|
|
|
|
|
| Bone Saw
|

|
|
RNG
|
POW
|
P+S
|
LOCATION
|
|
|
|
0.5
|
3
|
10
|
Head
|
|
- Powerful Attack - When attacking with this weapon, this model can spend 1 focus point to boost all attack and damage rolls for the attack.
- Critical Armor-Piercing - When calculating damage from this weapon on a critical hit, halve the base ARM stat of models hit.
|
Theme Forces
Recent Changes
No changes since 2021.10
Thoughts on Ripjaw
Ripjaw in a nutshell
Ripjaw as an arc node
The Arc Node is one of the most useful abilities a model can have, and with Cryx you can field them very cheaply. An arc node allows your warcaster to cast spells using the arc node as the point of origin. The obvious benefit is casting spells on the frontline while staying safely in the backline. You can also use it to launch surprise attacks from unexpected angles, by running an arc node right across the board into a good position before activating your warcaster. For this reason it pays to keep at least one arc node on the outskirts of the conflict, waiting for an opportunity.
Ripjaw as a combat jack
With Powerful Attack it's quite an efficient melee combatant with a good chance of rolling a crit for large damage spikes. And it's only 1 point more than the Deathripper, the absolute cheapest arc node.
Cryx's arc nodes are not renown for being a threat in combat, often used solely as arc nodes. Use this misconception to surprise your opponents.
Combos & Synergies
- If you want to use it in melee, try Empowering it with a Warwitch Siren first. With 2 focus it has a better chance of killing whatever it attacks and thus getting itself un-engaged and free to arc spells again.
- Skarre1 can cast Dark Guidance for an extra attack die, giving it a fantastic chance of rolling a critical.
- Venethrax he loves an arc node for mortality and terminal velocity helps land the crit. Counter charge is also a lot better on the ripjaw, due to its enhanced combat profile.
- Likewise, casters or models that grant rerolls can help reach a critical roll. The Withershadow Combine or Eilish brinmg Puppet master for this. Scaverous has Knowledge of the Damned.
- Asphyxious4 - In a match up where you want to place his clouds in a more forward position, or want to sling around some Hellfires, an Arc Node isn't terrible on Gaspy. Dark Shroud makes it's bites leave more of a mark, especially on a crit.
Drawbacks & Downsides
- Its damage grid has just enough boxes to allow the bonejack to take a good hit and keep going, but a second one will likely leave it crippled if not totally destroyed. This sets the tone for Cryx bonejacks being fast and hard to hit, but easily damaged if they are struck.
- You have to have a plan that involves getting into melee or there isn't much reason to pick the cheaper Deathripper
Tricks & Tips
- Slam a target to cause damage and leave it knocked down. This has the added benefit of leaving the Ripjaw out of combat afterwards so its arc node may still be used.
Other
Trivia
- Released in Forces of Warmachine: Cryx (June 2010)
- Nickname(s): Bonechicken, Deathchicken, Chicken (these names can refer to any of the Cryx arc nodes)
Other Cryx models
Rules Clarifications

|
Rules Clarification : Warjack (Edit)
- The Cortex/Induction core rule means a warjack cannot have more than 3 focus at any time (maybe 4 if they're really special).
- Many abilities give out focus and don't state an upper limit (such as Convection and Empower). Despite not stating an upper limit, they are always "hard-limited" by the core rule.
- A warjack can have more than 3 focus during a turn, though. For instance, a knocked down warjack can Power Up and be Allocated 2 focus, then spend 1 to shake knockdown, then another model could Empower it back up to 3.
- Warjacks cannot spend focus outside of their activation. For instance, they can't boost free strikes or trigger Powerful Attack on Broadsides. (Infernal Ruling)
Inert warjacks
- Abilities that say they cannot be used if the model is stationary (such as Shield Guard) cannot be used while a warjack is inert, either. Refer "Warcaster Destruction", page 59 of the core rulebook.
|
Rules Clarification : Construct - None yet. (Edit)
|
|
Rules Clarification : Channeler and/or Arc Node (Edit)
General
- It is possible to channel a spell with a range of CTRL. The control range is still measured from the caster though, so channeling it has zero effect ... unless you've got something like Empowered Arc Node or Reaction Drive. Stuff like that can trigger. (Infernal Ruling)
Channeling in melee
- A channeler that is engaged by an enemy model can not channel.
- A channeler that is engaging an enemy model can channel. (For example, the channeler is standing in the enemy's back arc.)
Channeler - LOS
- You use the channeler's abilities when determining LOS (such as whether you can see your target through a forest).
- If the channeler has an ability to ignore LOS or DEF bonuses (such as Eyeless Sight), then you only apply that "ignorance" to LOS (but not to the DEF bonus).
Caster - Attack roll
- You use the caster's abilities when determining attack roll modifiers (such as whether a target standing in a forest gets +2 DEF or not).
- If the caster has an ability to ignore LOS or DEF bonuses (such as Eyeless Sight), then you only apply that "ignorance" to the dice roll (but not to the LOS).
Stealth - It affects both LOS and the attack roll
- Since Stealth has both a LOS modifier (stealth models more than 5" away aren't intervening models) and an attack roll modifier (stealth models more than 5" away are auto-missed) things get a little complicated.
- If only the channeler ignores stealth, then all stealth models count as intervening models and block LOS, but the caster will auto-miss models more than 5" from the channeler.
- If only the caster ignores stealth, then only models within 5" of the channeler block LOS, but the caster won't auto-miss no matter what you target.
- If both channeler and caster ignore Stealth, it works as you'd expect.
-
Stealth Examples [Show/Hide]
- Caster has Eyeless Sight, channeler does not.
- Stealth model is within 5" of channeler
- LOS - The model counts as an intervening model, as per the normal Stealth rules
- Attack roll - If you attack it then you don't auto-miss, as per the normal Stealth rules
- Stealth model is more than 5" away from channeler
- LOS - The model does not count as an intervening model, as per the normal Stealth rules.
- Attack roll - If you attack it then you don't auto-miss, as the attacking model has Eyeless Sight.
- Stealth model is more than 5" away from channeler, and you want to target a model behind it.
- LOS - The front model doesn't block LOS
- Attack roll - Doesn't auto-miss
-
- Caster hasn't got Eyeless Sight, channeler does.
- Stealth model is within 5" of channeler
- LOS - The model counts as an intervening model, as per the normal Stealth rules
- Attack roll - If you attack it then you don't auto-miss, as per the normal Stealth rules
- Stealth model is more than 5" away from channeler
- LOS - The model counts as an intervening model, because the model drawing LOS ignores Stealth.
- Attack roll - If you attack it then you will auto-miss, as the attacker doesn't ignore Stealth.
- Stealth model is more than 5" away from channeler, and you want to target a model behind it.
- LOS - The front model blocks LOS, so you can't target the rear model.
- Attack roll - N/A
|
|
|
Rules Clarification : Powerful Attack (Edit)
- If your weapon can make multiple attacks (such as a Charger's ROF 2 gun) then you need to declare (and pay for) Powerful Attack for each attack. (Infernal Ruling)
- You must declare whether you're using Powerful Attack before making any attack rolls. If you choose not to use it on attack rolls, you can't trigger it on damage rolls. (Infernal Ruling)
- Exception: If your attack auto-misses, such as an AOE vs Stealth, then you can declare it after deviation but before making damage rolls. (Infernal Ruling)
- If you declare you're using Powerful Attack, it will apply to to-hit roll(s) and damage rolls. You can't choose to have it just boost the attack roll(s) or just boost the damage roll(s). (Infernal Ruling)
- The Powerful Attack bonus doesn't apply to "secondary" damage such as Magic Bullet or Electro Leap.
|