Revision as of 17:52, 26 July 2022 by imported>Warmachine University contributors
(diff) ← Older revision | Latest revision (diff) | Newer revision → (diff)
| Mk4 has been announced, and we need to talk about what it means for the future of this website.
Please join the discussion either on the WMU Facebook Group or the Talk:Main Page area of this wiki.
|
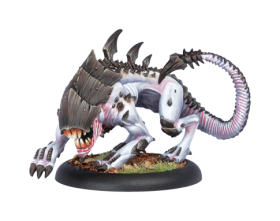
A long-forgotten monster of prehistory, the Raek hunted and terrorised the enemies of the dragon and his servants. Now the Legion calls these sleek and graceful predators forth again to hunt across endless distances. The Raek's tracking skills and killing power exemplify Everblight's genius at improving upon nature.
Basic Info
| Raek |
| Missing Info |
|
|
| COST |
{{{cacost}}} |
| UNIT SIZE |
{{{casize}}} |
| FA |
{{{cafa}}} |
| Warcaster 0 |
| BASE |
Medium |
| SPD |
7 |
| STR |
8 |
| MAT |
6 |
| RAT |
N/A |
| M.A. |
N/A |
| DEF |
15 |
| ARM |
14 |
| CMD |
N/A |
| ESSENCE |
{{{essence}}} |
| FOCUS |
N/A |
| FURY |
3 |
| THRS |
9 |
| HP |
18 |
| F. Field |
N/A |
|
|
|
|
| WJP |
{{{wjp}}} |
| WBP |
{{{wbp}}} |
| IHP |
{{{ihp}}} |
| FA |
U |
| UNIT SIZE |
N/A |
| COST |
6 |
| N/A |
| N/A |
|
|
|
|
| N/A |
| Warcaster 1 |
| COST |
N/A |
| N/A |
Understanding
the Statblock |
|
- Warbeast - All warbeasts share a huge stack of special rules. The short version is they're big, furious, and beat stuff up pretty good. Click here for a newbie-friendly recap, or click here for the full rules.
Abilities
Weapons
- Bite - 0.5" reach, P+S 11 melee attack.
- Tail Strike - 1" reach, P+S 12 melee attack.
Animus
|
|
COST
|
RNG
|
AOE
|
POW
|
DUR
|
OFF
|
|
|
|
|
| Still as Death
|
1
|
SELF
|
-
|
-
|
Round
|
No
|
|
The spellcaster gains Countercharge. Still as Death lasts for one round.
- Countercharge - When an enemy model advances and ends its movement within 6" of a model with Countercharge and in its LOS, the model with Countercharge can immediately charge it. The model with Countercharge can use Countercharge only once per round and not while engaged.
|
Theme Forces
Recent Changes
No changes since 2020.09
Thoughts on Raek
Raek in a nutshell
The Raek is a very good, combat oriented light warbeast, and arguably one of the best among the Hordes factions. Like many Legion units, it trades raw hitting power, for excellent mobility. With natively high SPD and DEF, Pathfinder, Stealth, Bounding Leap and Extended Control Range it is a versatile piece in the faction's arsenal. The Raek can disrupt enemy lines by leaping into back arcs, jam them by charging in first with incredible speed, hunt down key solos, or contest a zone from the far flank with DEF 15 and Stealth.
Raeks are also strong assassination-enablers, with the ability to leap into a caster's back arc and then Head-Butt them down (or Head-Butt an intervening model to open up LOS).
Raeks won't usually win a one on one with another light jack or beast, but they can severely slow them down, if there are no infantry flak/screens or squishy support/assassin solos to be sent after. The Raek's animus is fairly corner case, but it's not awful to have around.
Combos & Synergies
The mobility of a Raek cannot be understated, and their general self-sufficiency means they can be slotted into a huge variety of lists. A pair of Raeks can tie up a lot of board space, replacing the need to bring screening infantry in some cases - good news for players who love to run exclusively beasts + support. Extended CTRL range works on any spell, ability and feat which is tied to CTRL area (but not for CMD related ones like Thagrosh1's Death Shroud). There are certainly a few combinations of note worth calling out.
- Bethayne2 - She loves having cheap and mobile arc nodes and with Extended Control Range, Pathfinder and Bounding Leap the Raek can be very far away from Beth, get into inconvenient places, and still be used as an arc-node.
- Fyanna2 can get a decent amount of work from a Raek or two. They're unlikely to be targets for Fury, but on her feat turn they are DEF18 and have Dodge, and are always stealthed, meaning they're pretty hard to remove at range or in melee. An early feat turn pretty much ensures they can be delivered against most armies, which allows them to do what they do best.
- Abby2 makes all beasts amazing, there's no doubt about that, but Raeks especially become incredibly cost efficient with her. On her feat, they can go pretty much anywhere they want, and hit hard and accurate enough to prove a threat to harder targets.
- Vayl1 may find use for a Raek as a reliable delivery method for Chiller (Frost Field), abusing Bounding Leap to allow it to spread the DEF debuff deeper into enemy lines. The Raek's mobility might be seen as a good tool for a fast arc node, but since Vayl has a very short range on her shot, it actually hampers the Raek's ability to extend her spell threat.
- This is even more true for Vayl2, as she doesn't ignore the Raek's stealth and must force it to stay even further back.
- The Raek's animus may be useful for Rhyas1 or Rhyas2, as a way to threaten or section off areas of the board. Be careful when using this tactic (especially for Rhyas1), as it may end up being a good way of killing yourself if you underestimate your opponent. Rhyas2 may be able to get away with more, as you can use the counter charge as an excuse to abuse the Twins' feat the following turn if your opponent takes the bait.
- With any caster, a well positioned Raek can enable reliable assassination via headbutt from 12.5" inches away (assuming the headbutt lands). This threat is nonlinear, and the last 5" ignores free strikes thanks to Bounding Leap being a "place" effect. Add 2" if you can justify a a slipstream from Seraph or your caster. At best, the enemy caster is easier to hit than the broadside of a barn, and at worst, they're stuck in melee with an angry dragon panther.
- It's the perfect fit for a Blight Archon, as it grants its battlegroup sprint. The Raek and go contest scenarios, hunt support and then sprint to threaten counter charges, while the Archon hangs out and buffs its brethren.
- Thagrosh0 - Thanks to Extended Control Range, the Raek gains concealment from FoW from 20" away, which is pretty handy. With Everblights Guidance, the Raek can also set up Headbutts on key targets that Thagrosh can follow up on with Blight Burst and prevent shaking.
- Kryssa - +3 STR makes it hit way above its weight class.
Drawbacks & Downsides
- Low ARM and HP - beware stationary and knock-down tricks
- Average MAT relies on either back-strikes or boosts, cutting into your potential damage output.
- To get the most of its turn, a Raek is likely to use its full FURY stack, and will be too far deep to benefit from beast support like the Forsaken or Shepherds, especially if using Extended Control Range to its full potential.
Tricks & Tips
- You can spend your full Fury stack to enable an assassination: one to Bounding Leap into the caster's back arc, one to make a Head-Butt power attack, and the final one to boost to hit. The Raek won't be able to do much damage unassisted, but it can set up harder-hitting models for a devastating turn.
- Watch out for large/huge based casters; you cannot head-butt them.
- Read clarifications about Bounding Leap - beside many things, the most important point is that it can be triggered only if you used your normal movement for a full advance, not in case of charges or power attacks.
Other
Trivia
Released in Hordes: Evolution (2007)
Other Legion models
Rules Clarifications

|
Rules Clarification: : Warbeast (Edit)
(Click Expand to read)
|
See also the Warbeast page for a recap of the core warbeast rules.
- Forcing
- If an ability doesn't specify how much it costs to force, it costs 1. (Infernal Ruling)
- Animi
- A single Animus can be on several models at the same time. (Infernal Ruling)
- Unlike in Mk2, in Mk3 if a model has an animus on it from any source and then another animus is cast on that model, it will lose the first instance of an animus and will be replaced by the second. It does not matter if either the first animus or the second animus is from a warlock or warbeast. (Infernal Ruling)
- An animi cast by a warlock is an animi and a spell. (Infernal Ruling)
- Transferring Damage
- If both the warlock and the warbeast are damaged by the same attack (such as an AOE), then you need to apply the 'normal' damage to the warbeast before the transferred damage. This distinction can be important when you're working out who/what actually destroyed the beast. (Infernal Ruling)
- Frenzy (Edit)
- You cannot trigger optional abilities (such as Cleave or Sprint). (Infernal Ruling)
- You must trigger compulsory abilities (such as Consume) ... except for compulsory abilities that also generate an extra attack (such as Berserk). In that case, you don't get the Berserk attack. (Infernal Ruling)
- A warbeast may not make an Assault shot as part of a Frenzy activation.
- If the closest target to a warbeast resolving a Frenzy cannot be charged, then the warbeast will forfeit movement and action (as per the rules of having to charge and not being able to). (Infernal Ruling)
- If a frenzying warbeast can't reach its charge target (because the charge lane is blocked by terrain, etc) then it will make a failed charge and end its activation. (Locked thread)
- If a frenzying warbeast has two melee weapons with the same POW, it can choose which one to use. (Infernal Ruling)
|
|
|
Rules Clarification : Eyeless Sight (Edit)
- A model that ignores Stealth must ignore both aspects: both (1) the auto-missing, and (2) the 'not counting as an intervening model' parts.
- This can have some strange interactions with casters & channelers, if one has Eyeless Sight and one does not. There are examples on the Category:Channeler page.
- Blind vs Eyeless Sight (Edit)
- If a model is Blinded, and then given Eyeless Sight, then that model ignores Blind ... but it is technically still Blinded. So if you somehow later lose Eyeless Sight (for instance walking out of the range of Menoth's Sight), it will immediately go back to suffering the effects of Blind. (Infernal Ruling)
- Also this means stuff that only works vs Blind models (ie Hidden Blade) will still trigger vs a "Was Blinded but then got Eyeless" model.
- Anti-Cloud abilities vs Burning Earth (Edit)
- If you make a piece of terrain "Burning Earth" it counts as a cloud effect in addition to it's original type. This has 2 odd rulings:
- If any part of the terrain piece is "hit" by an ability that makes clouds expire (such as Gale Winds) then the entire terrain piece is taken off the table. (Infernal Ruling)
- If a model can ignore clouds but not the original terrain type, they don't ignore the terrain. For instance if you have a burning forest, then Eyeless Sight can't see through the forest. (Infernal Ruling)
|
Rules Clarification : Soulless - None yet. (Edit)
|
|
Rules Clarification : Stealth (Edit)
- Stealth models are not invisible and you can target them - you'll just auto-miss most of the time.
- You can target them with a charge.
- You can target them with an AOE, have it auto-miss and scatter, luckily land on top of them anyway, and that will hit them.
|
|
|
Rules Clarification : Bounding Leap and/or Jump and/or Leap (Edit)
- You cannot use this ability if you forfeit your movement, because "After making a full advance" is a conditional requirement. (Infernal Ruling)
- You can only use this ability after a full advance, which means you can't do it after a Slam, Trample, or Charge.
- You can use "At any time" abilities between completing your move and doing the Jump/Leap. (Infernal Ruling)
- Jumps & Leaps are a "placement". They do not trigger free strikes, and you can even jump over solid buildings of infinite height.
- If you cannot advance more than 0" (for example suffering from Shadow Bind) then you can Jump/Leap. Making an advance of 0" is sufficient to trigger Jump/Leap.
- Jump only
You cannot use Jump if you are suffering "any effect which prevents charging". So...
- If you forfeit your Normal Movement, you cannot Jump. (For the same reason as given above.)
- If you forfeit your Combat Action, you cannot Jump. (Infernal Ruling)
- If you "cannot make attacks" (such as with Morvahna1's feat), you cannot charge, therefore cannot Jump. (Locked Thread)
- Unit with Jump
- Complete all the models' Normal Movement before starting any Jumps. Then do all Jumps (that you can do and/or want to do) before starting any Combat Actions. (Infernal Ruling)
- Models in a unit can Jump even if they don't receive a Press Forward order (failing to be told to charge is not the same as being prevented from charging). (Infernal Ruling)
|
Rules Clarification : Extended Control Range and/or Long Leash - None yet. (Edit)
|
|
Rules Clarification : Still as Death (Edit)
|
|
Rules Clarification: : Countercharge (Edit)
(Click Expand to read)
|
Timing
- If the moving model has Assault, the Countercharge is resolved before the Assault attack. (Infernal Ruling).
- If the moving model has a rule that resolves "at the end of Normal Movement" (such as Slipstream), the Countercharge is resolved before the other rule. (Infernal Ruling)
- The moving model cannot use an "Any Time" after finishing their advance but before your Countercharge. They can use it only after the Countercharge is resolved.
- If the non-countercharging player has a similar "ends an advance" trigger (such as Admonition) then they can trigger and resolve that from your countercharge movement.
- Example: Model [A] charges, and triggers Countercharge on [B]. Model [B] countercharges, and triggers Admonition on [C].
Resolve Admonition on [C]. Then finish resolving Countercharge on [B]. Then finish model [A]'s activation.
Triggering Countercharge
- You can trigger Countercharge if you're engaging, but not engaged.
- You can trigger Countercharge during your own turn, if your opponent has an ability to move during your turn (such as Admonition).
- Some abilities let you "ignore intervening models when declaring a charge" (such as Flight). Unfortunately, you still need LOS to trigger Countercharge, and it's only after CC is triggered that you actually get to declare a charge. In other words, Flight and Countercharge don't work together for LOS purposes.
- What does trigger Countercharge
- Countercharge triggers off any advance, not just in-activation stuff.
- Standing still but changing facing is an advance.
- What doesn't trigger Countercharge
- Aiming, or forfeiting your movement, is not advancing.
- If a model doesn't move, doesn't change facing, doesn't aim ... does nothing but skips straight ahead to its Combat Action, this is not an advance. (Infernal Ruling)
- Being placed (such as Teleport) is not an advance.
- Involuntary movement (being slammed, thrown, or pushed) is not an advance.
- When a unit is moving, countercharge is triggered on a model-by-model basis. So you can countercharge after any model in the unit has finished its move within range, but you can only countercharge that model who just finished its movement. You can't "save it" until the entire unit finishes moving and then say "I'm going to Countercharge the first guy you moved."
Attacks, Boosting, & Other Triggers
- You only get one attack when making a countercharge, regardless of how many initials you normally have.
- The charge attack damage is only boosted if the Countercharger moved 3" or more, as with a regular charge.
- Countercharge occurs outside of activation so you can't spend fury/focus to boost a countercharge attack, nor buy additional attacks afterwards, not trigger stuff that only happens during your Combat Action (like Berserk).
- Even if you trigger Countercharge during your own activation, for the duration of you resolving the CC it "no longer counts" as being in your activation. (Infernal Ruling)
After the Countercharge
- The countercharging model cannot use any abilities that trigger on "during activation" or "during combat action" (such as Sprint), as Counter Charge is not an activation. (Locked thread)
Other interactions
- Countercharge during your own activation (Countercharge vs Admonition etc) ( Edit )
- You can trigger Countercharge during your own activation, but only if an enemy model moves during your activation. For instance, you move towards a model who has Admonition and they trigger that to try to move away. (You do a normal move, they trigger admonition and move, you trigger countercharge from their admonition-move.)
- However countercharge always counts as being out-of-activation, no matter when you trigger it. (Infernal Ruling)
- As a result, you can't trigger only-during-activation effects (such as Critical Shred & Sustained Attack).
- On the other hand, you can potentially get two charge attacks (one for your normal charge, one for the counter charge). (Infernal Ruling)
This ruling still applies even after the 2018.07 update (Infernal Re-ruling)
- Countercharge plus Admonition
- If a model has both CC and Admonition, it can trigger both at the same time. A model moves nearby, it admonitions away, then countercharges back in.
- Countercharge Inception
- If a model [A] has Countercharge, and it charges an enemy model [B] that has Countercharge and Admonition, then ...
- Model [A] charges and triggers CC and Admo on [B]
- Model [B] Admo moves but before it can resolve its own CC, it triggers CC on [A]
- You now have two models that have triggered CC simultaneously. So the Active player gets to resolve their one first.
- Assault vs Countercharge ( Edit )
- Countercharge & Cavalry ( Edit )
- A model with Countercharge and Cavalry can make Impact Attacks during the countercharge. (Refer "Charges Outside of Activation" in the rulebook).
|
|
 Eyeless Sight
 Soulless
 Pathfinder
 Stealth