Slaughterhouse
| Mk4 has been announced, and we need to talk about what it means for the future of this website.
Please join the discussion either on the WMU Facebook Group or the Talk:Main Page area of this wiki. |
| |
Slaughterhouse |
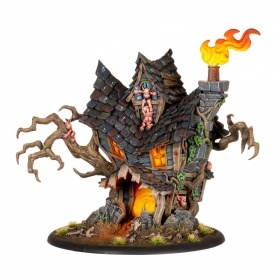
Grymkin are attracted not just to wicked souls, but sometimes to wicked places as well. A home or residence that has been the site of unspeakable acts of cruelty or violence can attract gremlins like moths to a flame. As more gremlins arrive to the growing celebration of debauchery, the residual malevolence of the acts performed inside the house begins to solidify, coagulating within its walls. Should the gremlin gala remain unchecked for too long, the house will become sentient and spring to “life.” Uprooted from its foundations, this animated grotesquerie, known colloquially as a “slaughterhouse,” is carried across the countryside by an ever-flowing tide of grave dirt and corpses. Within the afflicted building’s walls, the gremlin celebration remains at a constant climax in a party that will not end until the slaughterhouse itself is destroyed.
Hungry and malicious, a slaughterhouse seeks out individuals who have carried out the same acts that took place within its walls. A slaughterhouse that was once the site of a grisly killing will seek out souls stained by murderous deeds, a slaughterhouse animated by ritual sacrifices designed to summon horrors from the Outer Abyss will track down members of the nearest infernalist cult, and so on. When a slaughterhouse finds its prey, it drags its victim screaming through the maw of its front door. Once inside, the wicked individual is welcomed warmly by the gremlins, who hold a great feast in which the doomed soul is not only the honored guest, but the main course as well.
|
Basic Info
| Slaughterhouse | |||||||||||||||||||||||||||||||||||
|---|---|---|---|---|---|---|---|---|---|---|---|---|---|---|---|---|---|---|---|---|---|---|---|---|---|---|---|---|---|---|---|---|---|---|---|
 |
|
||||||||||||||||||||||||||||||||||
Warbeast - All warbeasts share a huge stack of special rules. The short version is they're big, furious, and beat stuff up pretty good. Click here for a newbie-friendly recap, or click here for the full rules.
Gargantuan - Gargantuans are mega-warbeasts, even bigger and stompier. They use nearly all the same rules as normal warbeasts but with a few alterations. These changes are summarized here or can be read in full here.
Abilities
-
 Construct
 -
 Pathfinder
 - Cram Inside - When an enemy model is destroyed or removed from play within 2" of this model, this model can immediately remove d3 damage points. Additionally, during its activation this model can spend corpse tokens on friendly Faction models within 2" of it to remove d3 damage points for each token spent.
- Escapees - When this model is destroyed by an enemy attack, collateral damage, or a continuous effect, you can replace it with a Gremlin Swarm solo. Then this model is removed from play.
Weapons
| Porch Light | |||||||||||||||
|---|---|---|---|---|---|---|---|---|---|---|---|---|---|---|---|
| RNG | ROF | AOE | POW | LOCATION | |||||||||||
| 12 | 1 | - | 13 | - | |||||||||||
| |||||||||||||||
| The Front Door | |||||||||||||||
| RNG | POW | P+S | LOCATION | ||||||||||||
| 0.5 | 7 | 21 | - | ||||||||||||
| Tree Limb (x2) | |||||||||||||||
| RNG | POW | P+S | LOCATION | ||||||||||||
| 2 | 5 | 19 | 1 each side | ||||||||||||
Animus
| COST | RNG | AOE | POW | DUR | OFF | ||
|---|---|---|---|---|---|---|---|
| Undergrowth
|
2 | SELF | (★) | - | Round | No | |
| While within 5" of the spellcaster, enemy models treat open terrain as rough terrain and suffer –2 DEF. Undergrowth lasts for one round. | |||||||
Theme Forces
- Bump in the Night
- Dark Menagerie - the Gremlin Swarm spawned by Escapees gains Serenity.
Recent Changes
2021.10 Mega Update
- -3 points
- Drag now triggers on hit, instead of on damage
Thoughts on the Slaughterhouse
Slaughterhouse in a nutshell
Don’t let the front door hit you on the way out the Slaughterhouse is a grabby melee monster that’s really difficult to escape from. Undergrowth, Pull and Drag each have different ways of keeping your opponent on their toes. They may have some models with pathfinder, they may have some models with parry and they may have some shield guards but rarely will they have all three at once.
The Slaughterhouse is an expensive centrepiece model which dishes out damage & controls the space around it about as good as any other Gargantuan. It's especially comparable to the Dracodile with a similar arcana and similar overall output. Like its Minions counterpart, the Slaughterhouse also has a lot of support options in faction and several warlocks geared for big-beast play.
In Dark Menagerie other models start with corpses. This gives the Slaughterhouse a ready food source to keep its healing up, making it much harder for your opponent's chip damage to be relevant. Requisition Crabbits and a Death Knell with a corpse adds to this durability in your traditional beast brick. Additionally Lady Karianna Rose is available in this theme, practically an essential pick with how well the House & her interact.
Bump in the Night is not built to support the Slaughterhouse, and you will generally find equivalent output out of other options which have actual theme support. Neigh Slayers & Piggybacks both serve as cheaper but similar threats/blockers respectively. However this theme does run Murder Crows and the Death Knell is still available, so while it's not strictly ideal the Slaughterhouse is still a great model and there is plenty of space for a great Bump list that has an extra huge base.
Combos & Syngergies
Warlocks
- The Slaughterhouse prefers to be in a chunky, beast-focused list and thus works best with Grykin warlocks who buff that style of play.
- The Child is a natural first pick when considering how good is a Grymkin beast
- The House can’t benefit from Tantrum, but Abuse and Pain Response and her Trump Arcana really let the slaughter commence.
- Discord stacks well with Undergrowth when you're facing enemy infantry. It creates a huge area of rough terrain, and Discord stops units from running or charging through it. It's especially great vs units that rely on Relentless Charge to get through rough terrain.
- The Heretic is another good warlock to pair with the Slaughterhouse
- Fury’s negative effect of -1 DEF doesn’t really matter when you're DEF 7, and getting hit by every attack anyway.
- The Heretic's Wall of Fire can be used to block an approach to the Slaughterhouse, or as a cheeky way to get in an extra attack by dragging a target through the fire
- More so than other Grymkin warlocks, the Heretic wants to end the game in charge range of the enemy warcaster. Having a tough huge base controlling a big portion of the table is a great way to enable that kind of scenario.
- The Dreamer loves beast bricks, and the Slaughterhouse naturally diversifies her preferred type of list
- She provides the Slaughterhouse with two much needed to hit buffs in the form of Mark Target and Manifest Destiny
- Phantasms are an even better way to block off a flank of the Slaughterhouse than the Heretic's Wall of Fire
- Zevanna Agha, The Fate Keeper (Grymkin) is a zany, but potentially extremely exciting Slaughterhouse warlock
- Boundless Charge is the threat extender the House really needs
- Rerolls on attack rolls fixes DEF extremely efficiently, especially if it can be layered with another MAT/RAT fixer
- Windstorm gives you even more control over your opponent's movement in the centre of the table
- The main reason to not play OW3 with the Slaughterhouse is that such a list contains two huge bases of critical value. It can often be tactically impossible for both to be in the ideal position, and it's extremely difficult to not sacrifice the Slaughterhouse's positioning while also leveraging Zevanna Agha.
Other Synergies
- Lady Karianna Rose is basically essential when playing the Slaughterhouse, and more than anything else is the main reason to choose Dark Menagerie.
- Enrage takes the Slaughterhouse's already great output and pushes it even higher. +2 STR scales really well on a model with so many potential attacks per turn.
- Ancillary Attack can be used to get in a second Drag. This is truly a game changer, since it allows the Slaughterhouse to stay relatively back from the frontlines while also potentially clearing multiple enemy heavies a turn.
- When Karianna dies, that +1/+1 will not go lost on the Slaughterhouse. If the big boy has a weakness, it's its cost compared to guaranteed output. Fixing MAT & RAT at the same time is so relevant that if Karianna spent an entire game just scoring once and then dying, she'd have been worth her points.
- Death Knell is another zany choice, but one which perhaps pairs better with the Slaughterhouse than Zevanna Agha.
- One huge base can screen the other, and since neither is your warlock you don't need to risk the game to do this
- The Slaughterhouse needs the armour and ready access to healing corpses.
- Dread Rots & the Malady Man are good screening options that exist in both themes.
- Isaiah, Dread Harvester is a very, very good model with even just a single unit of Dread Rots. It's more than viable to have him & the Slaughterhouse be the core of your list.
- Gorehounds & Rattlers are cost effective warbeasts that can take care of softer targets for the Slaughterhouse, so the House can focus on ripping the heads off heavies.
- Having a Rattler with the Slaughterhouse is particularly important due to how vulnerable the House can be to jamming infantry. Plus it helps that both models like the same kind of support.
- Similarly, a Clockatrice or two represents the next step up in performance if you can afford the points.
- Grave Ghoul rerolls are incredible with the Slaughterhouse, since they can be used at any time on either attack or damage. The Slaughterhouse is additionally almost guaranteed to generate a corpse out of anything it targets that isn't a Construct.
- This is especially a strong combo since the House doesn't actually take the corpses it generates, and needs a friendly receiver nearby.
- Also unfortunately, theme restrictions means you'll have to choose between a pair of Grave Ghouls or Lady Karianna Rose. Rose synergizes better with the House in a vacuum, so this decision needs to be carefully considered in the context of your pair.
- A Cage Rager makes a good Slaughterhouse bodyguard.
- It's a tougher large base beast with decent output, complementing the Slaughterhouse's role with more of the same.
- Protecting against magical attacks is critical. Most debuffs take the form of spells, and with a DEF of 7 there's little chance they'll miss. Additionally some lists use magic as their primary form of ranged attack (such as other Grymkin lists using the Defiled Archon) so being able to mitigate that damage can really open up the House's survival prospects.
- In Dark Menagerie, the Cage Rager starts with a corpse so can protect the House from minute one. Otherwise the Death Knell can be used, or the Slaughterhouse's Drag.
- The House's tree limbs lack Damage Type: Magical, meaning it can be difficult for the House to maximize its output when dealing with certain types of targets. The Cage Rager fixes this and gives Blessed on the side.
Drawbacks & Downsides
- Don't let the House die! This is way easier to do than it seems
- DEF 7 is almost as easy to hit as a knocked down or stationary model, so it often ends up a debuff magnet. Don't forget to watch out for electroleaps onto your backline models
- ARM 20 & 58 boxes seems like a lot, but that's actually less effective HP than two Skin & Moans with a couple of corpses.
- The Slaughterhouse's only defensive rule is its animus. This means it relies on other models in your army to create space, providing screening, and back up its output when down that 2 fury.
- High-powered shooting lists with mobility are the worst possible matchup for the Slaughterhouse. It will be nigh impossible to get work done while also keeping such a large target protected. Watch out for Dawnguard Tridents, Aurora2, or Crucible Guard lists (among many others).
- It’s an issue with all gargantuans, but 35 points is a big chunk of any single list and it’s unlikely that the Slaughterhouse will make its point to back in a single round of combat. Karianna Rose can really help here, as can literally any DEF fixer.
- It's also worth noting that almost any other combination of hard hitting Grymkin models will end up being more cost effective. If piece trading is your goal, bring Skin & Moans or Neighslayers instead.
- You bring the Slaughterhouse for the last couple of turns of the game, when your opponent does not have enough punch in their army to one-round the House, letting you maximize its healing & Drags.
- You need to buy a Gremlin Swarm to use escapees. You also won’t get the escapees if the house is removed from play.
- Cheap shield guards really mess with it’s gun. Don't expect too many Drags when playing against Convergence.
- It can be very awkward to position more than one huge base effectively every turn. Don't expect to be able to play a list that pairs the Slaughterhouse with Zevanna Agha or a Death Knell without some practice. More so than other Grymkin models, the Slaughterhouse is strong because of how it is used and the list it is facing more so than the list it is in.
- While the Drag & Front Door are magical, the giant Tree Limbs are not. Against some targets this can be a real drag (heh), since you might need Magical to actually deal damage.
- A Cage Rager can solve this problem with its animus if needed.
Tricks & Tips
- Cram Inside can be used on every dead or removed-from-play enemy model within 2". This includes,
- Models the Slaughterhouse kills
- Models other models kill
- Models that an opponent has that get removed-from-play by their own rules
- This also means the corpses are free to be grabbed by another friendly model, such as a Grave Ghoul or Death Knell.
- The Slaughterhouse is a Construct Warbeast, meaning it will never frenzy and does not generate a corpse or soul (the Gremlin Swarm it creates will have a corpse & soul however, so it's not a total loss).
- This can let you run hot early in the game, only taking off the minimum amount of fury needed to use the animus each turn. Once you hit turn 5 and are down a couple of beasts, that's when you empty out the House and get it involved.
- The Slaughterhouse is a Gargantuan which gives it a whole host of very useful rules
- Most importantly the Slaughterhouse is immune to Grievous Wounds. You can't stop the Cramming (inside)!
- The House cannot be pushed or placed, or move out of activation.
- The House can always use its gun, even when engaged in melee
- Unfortunately this also means you can't block line of sight to the Slaughterhouse, hence why it's so vulnerable to enemy ranged attacks
- Escapees is a "may" not a "must", meaning you can choose not to create the Gremlin Swarm if you wish. This can be useful if that Swarm would block other models or be killed by an enemy to generate a corpse/soul.
Other
Trivia
- Released 2021.05
- This model is a BAHI model. It is not available in stores, it can only be purchased directly from PP's online store (or 2nd hand).
Other Grymkin models
| | |||||||||||||||||||||||||||||||||||||||||||||||||||||||||||||||||||||||||||||||||||||||||||||||||||
| Battlegroup | |||||||||||||||||||||||||||||||||||||||||||||||||||||||||||||||||||||||||||||||||||||||||||||||||||
| Warlocks |
The Child -
The Dreamer -
The Heretic -
The King of Nothing -
The Wanderer -
Old Witch 3 | ||||||||||||||||||||||||||||||||||||||||||||||||||||||||||||||||||||||||||||||||||||||||||||||||||
| Warbeasts |
Lesser: Crabbit |
Light: Frightmare - Gorehound - Rattler | |||||||||||||||||||||||||||||||||||||||||||||||||||||||||||||||||||||||||||||||||||||||||||||||||
|
Heavy: Cage Rager - Clockatrice - Skin & Moans |
Gargantuan: Slaughterhouse | ||||||||||||||||||||||||||||||||||||||||||||||||||||||||||||||||||||||||||||||||||||||||||||||||||
| Units, Solos, & Battle Engines | |||||||||||||||||||||||||||||||||||||||||||||||||||||||||||||||||||||||||||||||||||||||||||||||||||
| Units |
Dread Rots - Hollowmen - Mad Caps - Malady Man - Murder Crows - Neigh Slayers - Piggybacks - Twilight Sisters | ||||||||||||||||||||||||||||||||||||||||||||||||||||||||||||||||||||||||||||||||||||||||||||||||||
| Solos |
Baron Tonguelick, Lord of Warts - Cask Imp - Defiled Archon - The Four Horseymans - Glimmer Imp - Grave Ghoul - Gremlin Swarm - Isiah, Dread Harvester - Lady Karianna Rose - Lord Longfellow - Trapperkin - Weird Wendell - Witchwood | ||||||||||||||||||||||||||||||||||||||||||||||||||||||||||||||||||||||||||||||||||||||||||||||||||
| Battle Engines | Death Knell | ||||||||||||||||||||||||||||||||||||||||||||||||||||||||||||||||||||||||||||||||||||||||||||||||||
| Theme Forces | Minions | ||||||||||||||||||||||||||||||||||||||||||||||||||||||||||||||||||||||||||||||||||||||||||||||||||
| Dark Menagerie - Bump in the Night | Refer to Category: Grymkin Minion | ||||||||||||||||||||||||||||||||||||||||||||||||||||||||||||||||||||||||||||||||||||||||||||||||||
| This index was last updated: 2021.08 | |||||||||||||||||||||||||||||||||||||||||||||||||||||||||||||||||||||||||||||||||||||||||||||||||||
Rules Clarifications

|
Rules Clarification: : Warbeast (Edit) |
See also the Warbeast page for a recap of the core warbeast rules.
|
|
|
Rules Clarification : Gargantuan (Edit)
Huge Base (Edit)
Also, simply being on a huge base triggers a bunch of rules scattered throughout the rulebook, click to read them. [Show/Hide]
From the 2020.02 edition of the core rules (Edit)
|
Rules Clarification : Construct - None yet. (Edit)
|
|
Rules Clarification : Pathfinder (Edit)
|
|
|
Rules Clarification : Cram Inside (Edit)
|
|
|
Rules Clarification : Escapees (Edit)
|
|
|
Rules Clarification: : Magical Damage (Edit) |
* The "Damage Type: Magical" is not inherited by "secondary" damage from a weapon. That is, stuff like arcs (Electro Leap) or hazards (Scather). (Infernal Ruling)
|
|
|
Rules Clarification: : Drag , Pull, and/or Catch (Edit) |
Timing
|
|
|
Rules Clarification : Undergrowth (Edit)
|