| Mk4 has been announced, and we need to talk about what it means for the future of this website.
Please join the discussion either on the WMU Facebook Group or the Talk:Main Page area of this wiki.
|
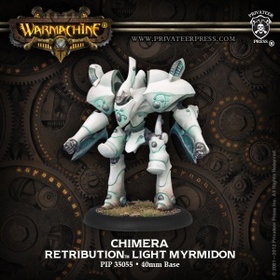
The Chimera has an unsettling appearance as its active power field makes its form blur and fade. Once it nears the enemy, a Chimera becomes a delivery device for its warcaster’s most powerful arcane powers, channeled across its arc node. The Chimera will strike and kill with its scything arm-mounted glaives, then vanish as nearby soldiers turn to desperately engage it. With a flicker of blended light it appears behind them to deliver arcane death.
Basic Info
| Chimera |
| Missing Info |
|
|
| COST |
{{{cacost}}} |
| UNIT SIZE |
{{{casize}}} |
| FA |
{{{cafa}}} |
| Warcaster 0 |
| BASE |
Medium |
| SPD |
6 |
| STR |
8 |
| MAT |
6 |
| RAT |
N/A |
| M.A. |
N/A |
| DEF |
13 |
| ARM |
16 |
| CMD |
N/A |
| ESSENCE |
{{{essence}}} |
| FOCUS |
N/A |
| FURY |
N/A |
| THRS |
N/A |
| HP |
20 |
| F. Field |
6 |
|
|
|
|
| WJP |
{{{wjp}}} |
| WBP |
{{{wbp}}} |
| IHP |
{{{ihp}}} |
| FA |
U |
| UNIT SIZE |
N/A |
| COST |
8 |
| N/A |
| N/A |
|
|
|
|
| N/A |
| Warcaster 1 |
| COST |
N/A |
| N/A |
Understanding
the Statblock |
|
Warjack - All warjacks share the same set of special rules. Most notably being big and stompy. Click here for a newbie-friendly recap, or click here for the full rules.
Abilities
-
 Arc Node
-
 Construct
- Apparition - During your Control Phase, place this model anywhere completely within 2" of its current location.
- Field Dependent - While its Field Generator system is crippled, this model loses Apparition and Phantasmal Field
- Force Fields - This warjack has an extra damage track that takes damage first. Once per turn during its activation, this model can spend 1 focus point to remove 5 damage points from its force field damage track unless its Field Generator system is crippled.
- Phantasmal Field - This model gains +1 DEF against ranged and magic attacks for each focus point on it.
Weapons
|
|
|
|
|
|
|
|
|
|
|
|
|
|
|
|
| Glaive (x2)
|

|
|
RNG
|
POW
|
P+S
|
|
|
|
0.5
|
4
|
12
|
|
-
 Open Fist Open Fist
- Combo Strike (★ Attack) - Make a melee attack. Instead of making a normal damage roll, the POW of the damage roll is equal to this model's STR plus twice the POW of this weapon. (Giving a total P+S = 16)
|
Theme Forces
Recent Changes
No changes since 2021.02
Thoughts on the Chimera
Chimera in a nutshell
The Chimera is a moderately costed arc node with the ability to extricate itself from melee and potential to be annoying to hit at range. Its Apparition ability makes it tricky to engage for enemy models trying to prevent it from channelling. It has a decent melee ability for a light and can threaten tougher foes with its Combo Strike.
Combos & Synergies
- Adeptis Rahn really wants one or two of these. As the preeminent spell slinger in the faction, being able to arc spells further and with different angles is always helpful.
- Both Elara, Death's Shadow and Magister Helynna like to have an arc node to get Marked for Death and Hand of Destruction, respectively, onto enemy models from a safe distance.
- Issyria, Sibyl of Dawn usually likes to have an arc node (well, two!) to nail key enemy pieces with Blinding Light from the safety of the edge of the killzone.
- Being backed up by Arcanist Mechaniks or House Shyeel Arcanists during early turns (when the entire army is either running or manoeuvring without engaging or shooting) is worth keeping the Chimera close by to load up with Focus to use Phantasmal Field.
- Goreshade4 - He loves an arc node and if you load it up with focus you fuel both Arcane Vortex and its Phantasmal Field.
- Falcir - Arcing a Force Hammer can be crucial and with Prey Upon and Full Throttle the Chimera can even do some work.
Drawbacks & Downsides
- Combo Strike will put out some good damage, but don't expect the Chimera to be a combat 'jack.
- It's rare to have focus available to invest in Phantasmal Field, so it will rarely see relevant use beyond the first turn.
- Like all light chassis channellers, plan for it to die after one turn of use as an arc node as most defensive tech (TK from Rahn, Admonition from Issyria etc.) is usually on more important army pieces.
Tricks & Tips
- Combat:
- If you're going to use this guy offensively, give him at most 1 focus for a total of 2. Spend the first focus to either do a charge + Combo Strike, a Power Attack Throw, or a Power Attack Slam; and the second focus to boost the hit roll.
- With the charge the damage is auto-boosted, and for the Power Attacks your purpose is trying to move the target out of the way rather than doing damage, so don't waste focus boosting damage.
- Your plan should never be to fill him up with 3 focus, charge a group of infantry, and buy attacks to kill them all. If you fail to kill any of them, you won't be able to use the arc node. If you want to waste an arc node blender-ing infantry ... maybe you should pick a different 'jack to put in your army list.
- Throws and Slams are a great way for this guy to contribute to the fight, and start "earning his points back", while minimising the chance he gets stuck in melee and unable to channel.
- Note that if you do Throw, you can only Throw medium bases and small bases.
- Due to the Chimera's limitations as a combat light, never have it too far out in front of your lines during the first and perhaps second turn. This allows more effective use of Phantasmal Field during the early stages and thus survivability. It can reach DEF 15 against ranged and magic attacks, which can make all the difference.
Other
Trivia
Released in Forces of Warmachine: Retribution of Scyrah (November 2009)
Other Retribution models
Rules Clarifications

|
Rules Clarification : Warjack (Edit)
- The Cortex/Induction core rule means a warjack cannot have more than 3 focus at any time (maybe 4 if they're really special).
- Many abilities give out focus and don't state an upper limit (such as Convection and Empower). Despite not stating an upper limit, they are always "hard-limited" by the core rule.
- A warjack can have more than 3 focus during a turn, though. For instance, a knocked down warjack can Power Up and be Allocated 2 focus, then spend 1 to shake knockdown, then another model could Empower it back up to 3.
- Warjacks cannot spend focus outside of their activation. For instance, they can't boost free strikes or trigger Powerful Attack on Broadsides. (Infernal Ruling)
Inert warjacks
- Abilities that say they cannot be used if the model is stationary (such as Shield Guard) cannot be used while a warjack is inert, either. Refer "Warcaster Destruction", page 59 of the core rulebook.
|
Rules Clarification : Construct - None yet. (Edit)
|
|
Rules Clarification : Channeler and/or Arc Node (Edit)
General
- It is possible to channel a spell with a range of CTRL. The control range is still measured from the caster though, so channeling it has zero effect ... unless you've got something like Empowered Arc Node or Reaction Drive. Stuff like that can trigger. (Infernal Ruling)
Channeling in melee
- A channeler that is engaged by an enemy model can not channel.
- A channeler that is engaging an enemy model can channel. (For example, the channeler is standing in the enemy's back arc.)
Channeler - LOS
- You use the channeler's abilities when determining LOS (such as whether you can see your target through a forest).
- If the channeler has an ability to ignore LOS or DEF bonuses (such as Eyeless Sight), then you only apply that "ignorance" to LOS (but not to the DEF bonus).
Caster - Attack roll
- You use the caster's abilities when determining attack roll modifiers (such as whether a target standing in a forest gets +2 DEF or not).
- If the caster has an ability to ignore LOS or DEF bonuses (such as Eyeless Sight), then you only apply that "ignorance" to the dice roll (but not to the LOS).
Stealth - It affects both LOS and the attack roll
- Since Stealth has both a LOS modifier (stealth models more than 5" away aren't intervening models) and an attack roll modifier (stealth models more than 5" away are auto-missed) things get a little complicated.
- If only the channeler ignores stealth, then all stealth models count as intervening models and block LOS, but the caster will auto-miss models more than 5" from the channeler.
- If only the caster ignores stealth, then only models within 5" of the channeler block LOS, but the caster won't auto-miss no matter what you target.
- If both channeler and caster ignore Stealth, it works as you'd expect.
-
Stealth Examples [Show/Hide]
- Caster has Eyeless Sight, channeler does not.
- Stealth model is within 5" of channeler
- LOS - The model counts as an intervening model, as per the normal Stealth rules
- Attack roll - If you attack it then you don't auto-miss, as per the normal Stealth rules
- Stealth model is more than 5" away from channeler
- LOS - The model does not count as an intervening model, as per the normal Stealth rules.
- Attack roll - If you attack it then you don't auto-miss, as the attacking model has Eyeless Sight.
- Stealth model is more than 5" away from channeler, and you want to target a model behind it.
- LOS - The front model doesn't block LOS
- Attack roll - Doesn't auto-miss
-
- Caster hasn't got Eyeless Sight, channeler does.
- Stealth model is within 5" of channeler
- LOS - The model counts as an intervening model, as per the normal Stealth rules
- Attack roll - If you attack it then you don't auto-miss, as per the normal Stealth rules
- Stealth model is more than 5" away from channeler
- LOS - The model counts as an intervening model, because the model drawing LOS ignores Stealth.
- Attack roll - If you attack it then you will auto-miss, as the attacker doesn't ignore Stealth.
- Stealth model is more than 5" away from channeler, and you want to target a model behind it.
- LOS - The front model blocks LOS, so you can't target the rear model.
- Attack roll - N/A
|
|
|
Rules Clarification : Apparition (Edit)
- Apparition is an "Other" Control Phase effect, so it happens at Step 7 of the Control Phase.
- It happens after paying for upkeeps, Power Up, etc
- If you have another "Other" Control Phase effect, you get to choose the order to resolve them.
- If a model is B2B with you when you use Apparition then they will be exactly 2" away afterwards. So you'll still be in the melee range of anything with RNG 2 or higher.
- Unit members must always be placed in formation. Refer to the "Placed" section of the core rulebook.
- If a trooper can't be placed in formation (because it's more than 2" out of formation to begin with) then it can't be placed at all.
- The unit commander is always "In Formation" by definition, so can be placed where it likes.
|
Rules Clarification : Phantasmal Field - None yet. (Edit)
|
|
Rules Clarification : Combo Strike (Edit)
- You cannot make a Combo attack if the weapon is crippled. Refer "Crippled Systems" in the core rulebook.
|
Rules Clarification : Field Dependent - None yet. (Edit)
|
|
Rules Clarification : Open Fist (aka, Power Attack Throw) (Edit)
- Throw ( Edit )
- See also the Throw article for a recap of the core Throw rules.
- If a model is somehow thrown at itself (which can happen with Durst1's feat) it would not move, it would be knocked down, and it would take a standard power attack damage roll but it would not take an additional die for colliding with itself. (Infernal Ruling)
- Because you move the target model between the attack roll and the damage roll, you can get different buffs applied to the two rolls. For instance, if you throw the target in or out of a Flanking model's melee range.
- Incorporeal vs Slammed/Thrown models ( Edit )
- Incorporeal models cannot be moved by someone trying to slam them.
- Slammed models can move through Incorporeal models.
- If they have enough movement to get past them, no dramas.
- If they land on them, you move the Incorporeal model out of the way as per the Rule of Least Disturbance.
- If the Incorporeal model cannot be moved (i.e. it's a flag) then you move the slammed model out of the way, also by the rule of Least Disturbance.
- For the purposes of Collateral Damage, only the model(s) you contacted before you applied the rule of Least Disturbance count as contacted.
- The same logic applies to Throws.
- Collateral Damage
- Collateral damage cannot be boosted and is not considered damage from an attack or model. Refer page 33 of the 2021.08 version of the rules pdf. As a result:
- It doesn't trigger stuff that relies on being hit by an enemy (such as Shock Field) or damaged by an enemy (such as Vengeance).
- It doesn't get bonus damage from stuff that adds to a model's damage roll (such as Signs & Portents or Prey).
- It doesn't matter if the attacker has crippled weapon systems or aspects.
- Throw - Power Attack
- When you make a Throw Power Attack, no other abilities of the Fist weapon (such as Chain Strike) are applied unless they specifically mention Throws. (Locked Thread)
- If you do a Power Attack Throw and you choose to throw the target directly away, no deviation is rolled to determine the final position of the model. (Locked thread)
- A model that cannot be targeted by melee attacks (such as Una2's feat) cannot have models thrown at them, either. (Infernal Ruling)
- Since throwing Model [A] at Model [B] involves making a melee attack roll vs Model [B] which is out of your melee range, it technically breaks a whole bunch of core rules. (Infernal Checking)
- Even though you make a "melee attack roll" vs Model [B] you don't actually make a melee attack vs it. Also, the damage it suffers is from Collateral damage, not from the original attack. So you can't trigger stuff like Snacking from damage you did to Model B.
|