| Mk4 has been announced, and we need to talk about what it means for the future of this website.
Please join the discussion either on the WMU Facebook Group or the Talk:Main Page area of this wiki.
|
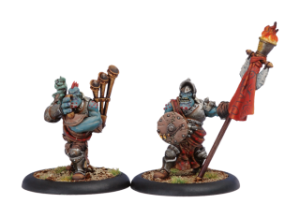
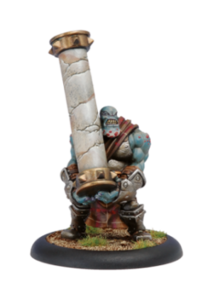
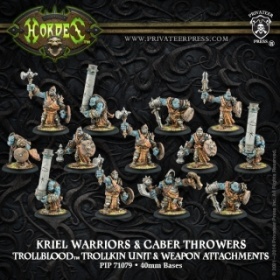
Kriel warriors are the heart of the armies of the trollkin. These bands of warrior brothers march to war in defense of their people wielding shields, hand weapons, and an indomitable spirit. They are often accompanied by mighty caber throwers, who put their prowess in the traditional sport of their people to lethal use against all enemies.'
Hurling cabers, stone columns that seem too big to lift, has proven a surprisingly effective and devastating attack in battles throughout the centuries. These weapons have more than justified the backbreaking effort as they tumble forward with bone-pulping power in a nearly unavoidable and crushing attack. Anything caught in the caber's path is usually reduced to paste.
Basic Info
| Kriel Warriors |
| Missing Info |
|
|
| COST |
{{{cacost}}} |
| UNIT SIZE |
{{{casize}}} |
| FA |
{{{cafa}}} |
| Warcaster 0 |
| BASE |
Medium |
| SPD |
5 |
| STR |
6 |
| MAT |
5 |
| RAT |
N/A |
| M.A. |
N/A |
| DEF |
12 |
| ARM |
15 |
| CMD |
8 |
| ESSENCE |
{{{essence}}} |
| FOCUS |
N/A |
| FURY |
N/A |
| THRS |
N/A |
| HP |
1 |
| F. Field |
N/A |
|
|
|
|
| WJP |
{{{wjp}}} |
| WBP |
{{{wbp}}} |
| IHP |
{{{ihp}}} |
| FA |
U |
| UNIT SIZE |
6 / 10 +2CA +0-3WA |
| COST |
7 / 11 +3CA +2 per WA |
| 1.1 each (no attachments) |
| 1.5 each (all attachments) |
|
|
|
|
| N/A |
| Warcaster 1 |
| COST |
N/A |
| N/A |
Understanding
the Statblock |
|
Abilities
- Everyone (excluding the Sorcerer)
- Leader, Grunts, & Piper (CA)
- Standard (CA)
- Granted: Rise - While this model is in formation, models in its unit gain Rise. (Rise - If a model with Rise is knocked down at the beginning of your Maintenance Phase, it stands up.)
- Standard Bearer - While this model is within 5" of its unit commander, the unit commander gains +2 CMD.
- Take Up - If this model is destroyed, you can choose a Grunt in this unit within 1" of it to be destroyed instead. Effects on this model expire, and it gains the effects on the chosen Grunt. Remove the Grunt from the table instead of this model. This model has the same number of unmarked damage boxes as the chosen Grunt.
- Piper (CA)
- Granted: Reposition [3"] - While this model is in formation, models in its unit gain Reposition [3"]. (Reposition [3"] - At the end of an activation in which it did not run or fail a charge, a model with Reposition [3"] can advance up to 3", then its activation ends.)
- Take Up
- Caber Thrower (WA #1)
- Take Up
- Carapace - This model gains +4 ARM against ranged attack damage rolls.
- Easy Target - When determining LOS to this model, other models ignore intervening models with an equal base size as this model.
- Mobile Cover - While this model is in formation, while within 2” of this model, friendly models with an equally or smaller base gain Carapace.
Weapons
| Leader, Grunts, & Piper (CA)
|
|
|
|
|
|
|
|
|
|
|
|
|
|
|
|
|
| Hand Weapon
|

|
|
RNG
|
POW
|
P+S
|
|
|
|
1
|
5
|
11
|
|
|
|
|
| Standard (CA)
|
- Unarmed - This model has no weapons.
|
| Caber Thrower (WA #1)
|
|
|
|
|
|
|
|
|
|
|
|
|
|
|
|
|
| Caber
|
|
|
|
RNG
|
POW
|
P+S
|
|
|
|
2
|
8
|
14
|
|
- Momentum - A small- or medium-based model directly hit by this attack is slammed d3" directly away from this model. The POW of collateral damage is equal to the POW of this weapon. In addition to suffering a normal damage roll, large-based models hit by this attack become knocked down.
- Single Shot - After an attack with this weapon is resolved, this model cannot make another attack with it for one round.
|
|
Sorcerer (WA #2)
As with all Trollkin units, the Kriel Warriors can attach Trollkin Sorcerer(s), whose information has been omitted for brevity.
Note you can only have 3 WA total (not 3 of each). You can have 1 Caber & 2 Sorcerers, or 2 Cabers & 1 Sorcerer, etc.
Theme Forces
Recent changes
2021.10 Mega Update
- Base unit and the CA gained +1 POW
- WA gained +1 POW, Carapace, Mobile Cover, and Easy Target
Thoughts on Kriel Warriors
Kriel Warriors in a nutshell
Kriel Warriors are cheap and tough troops that don't kill much. Able to shrug off an unboosted POW 10, their best use is jamming the enemy and making them work to kill you. They are poor troops at doing anything except catching bullets and blocking charge lanes. But sometimes quantity has a quality all of its own and the WA is a great support piece in its own right.
The purpose of the vanilla Kriel Warriors unit is to be 10 models for 11 points - and at that price you get what you pay for and will probably not be disappointed.
Thoughts on the Attachments
The Caber Throwers dramatically change the unit by offering small bubbles of Carapace and a little more hitting power at the cost of almost 2 grunts. Given that you will almost certainly be running a Krielstone this potential +6 armour can help see even the lowest armour solo or medium based warbeast across the table. It's not an aura that does much for the other members of the unit,partly because when they are dirt cheap you actually want your enemy shooting them rather than your more valuable targets.
The Command Attachment is more expensive than basic kriel warrior without adding that much to a unit that should always be running or charging. Rise and Reposition are nice but hardly worth 3 points unless you take the unit with all the trimmings at max size.
Combos & Synergies
Caster Combos
- Calandra1 makes them moderately hard to hit if they also have concealment or cover.
- Madrak Ironhide, Thornwood Chieftain can give use Even Ground to make them a real nuisance to kill.
- Madrak3 - Battle Lust lets them crack ARM, Spell Piercer lets them ignore defensive buffs and Defender's Ward makes them a nuisance to kill. Spamming Kriel Warriors also makes excellent use of his feat!
- Ragnor1 with so many bodies on the field they are a great Pulverizer target and his feat makes them a reliable anchor.
General Support
- Fell Caller Hero available in both themes they feature in you take the hero because you actually want these troops to be able to hit something.
- Trollkin Champions with Carapace are night unassailable to guns.
- Stone Scribe Chronicler helps turn them into a tarpit at range and helps models in range of a Warbeast fight better.
Storm of the North
Playing in SotN opens them up to all of the specific Northkin buffs, passively they gain immunity cold which is highly situational but useful. They can also have spells upkept on them for free allowing more resources to be used for cycling or supporting better models.
- Hooch Hauler as Northkin models they love the +1 to hit rolls and stumbling drunk.
- Northkin Elder - Moreso than just an armour buff, some speed and strength really helps the warriors.
Drawbacks & Downsides
- Interesting, fun, effective. It's arguable that the standard Kriel Warriors and CA fit none of these categories.
- MAT 5, SPD 5, POW 11, DEF 12, ARM 15. None of these stats are that great, they are an ungodly mixture of inaccurate, pillow fisted, slow, easy to hit. Their job is to take hits and they need the caber thrower to do this at range and the Krielstone to do this in melee.
- Other units are only slightly more expensive but actually get some work done.
- the Caber Thrower doesn't bring the armour cracking you may expect from a giant stone pole landing on your face.
- all those medium bases in a full 15 man unit are a pain to navigate around without tactician if you spread them out for jamming be sure not to jam yourself
Tricks & Tips
- Jam away.
- Keep a caster in Carapace range.
Other
Trivia
Other Trollblood models
Rules Clarifications

|
Rules Clarification : Combined Melee Attack (Edit)
- Each CMA only counts as a single attack, no matter how many participants are involved. This means, for example, that if Satyxis Raiders damage a warjack and trigger their Feedback ability, the enemy warcaster will only take 1 damage total, not 1 for every Raider.
- Any bonuses (such as back strike) or penalties (such as intervening terrain) are determined according to the model leading the CMA (the attack leader).
- If the participants have buffs/debuffs but the attack leader doesn't ... then the CMA doesn't because only the attack leader matters. Simple as that.
- A single unit can perform multiple CMAs, utilising different groupings of models. eg a unit with 10 models could make one 10-man CMA, or two 5-man CMAs, or five 2-man CMAs, or etc.
- CMA for units that have more than one melee weapon (the short version)
- Once you have more than one melee weapon, charging becomes a bit complicated. There are two important rules:
- A model which charges must use its first attack to make a charge attack. It can't "skip ahead" to contributing its second non-charge attack before it's resolved its first attack.
- For a CMA to gain the charging bonus, then all contributors must be contributing a charge attack.
- These two rules have a few, slightly confusing implications. Click the expand box below for a full breakdown.
| CMA for units with more than one weapon (the long version) (Edit)
|
The following example is about Satyxis Raiders, but is equally applicable to other units with two CMA:
- Each Raider gets two attacks. Both, one, or neither can be a CMA as you choose.
- If you are doing two CMA in a row, then you should note that the second CMA doesn’t have to use the same “primary attacker” or the same “participants” as the first CMA.
- For instance, you could have the first CMA with raider A being the "primary attacker" and raider B being the "participant",
- then for the second CMA have raider B the "primary attacker" and raider A the "participant".
- Or leave A alone for a moment and use B plus C. Whatever takes your fancy.
- Primary attackers and participants don't have to use the same weapon. So, continuing with the above example, you could have primary A use lash and participant B use horns, then primary B use lash and participant A use horns. Effectively granting you two lash attacks with CMA bonuses!
- Combined Melee Attack and charging
- Remember the 2 rules above?
- Rule 1 means you cannot contribute your second, non-charge attack before you have resolved/contributed your first attack.
- Rule 1 means you cannot "skip ahead" to resolving your second, non-charge attack before you have resolved/contributed your first attack.
- but wait, there's more!
- However, thanks to the "Units with Combined Melee Attack ignore the rule that one trooper's combat action cannot begin until the previous model's combat action ends" rule, you can "pause" your second attack if you want to do a CMA with it later. For example:
- Model A performs its charge attack.
- Model B performs its charge attack. (Interrupting A)
- Model C performs its charge attack. (Interrupting B)
- CMA using A, B & C's remaining attack.
|
|
Rules Clarification : Tough - None yet. (Edit)
Rules Clarification : Unyielding - None yet. (Edit)
|
|
Rules Clarification : Tactics vs Granted (Edit)
- Granted = The unit loses the ability as soon as the model that grants it is taken off the table. (think "G for Goes away")
- Tactics = The unit keeps the ability for the entire game, regardless of who dies. (think "Tac-Tick = K for Keeps")
-
- Granted [ Vengeance ]
- If the model granting Vengeance dies, the unit will not get any Vengeance attacks.
- It is "If you have Vengeance, and you were damaged last turn, you get a move+attack."
- It is not "If you get damaged, you get Vengeance next turn."
- If you lose Vengeance halfway through resolving Vengeance, then you stop resolving Vengeance immediately. (Infernal Ruling)
|
|
|
Rules Clarification : Standard Bearer (Edit)
- If the Officer dies, the Standard Bearer can give the CMD bonus to the Leader model.
|
|
|
Rules Clarification : Take Up (Edit)
- If you use Take Up the attacking model cannot trigger anything that needs the attacker to "Destroy" a model (such as Alpha Hunter, Killing Spree, Berserk, etc). Although the model that was attacked reached the Destroyed step of the timing sequence, Take Up negates that entirely. (Infernal Ruling)
|
|
|
Rules Clarification : Reposition (Edit)
- Models out of formation cannot move via Reposition. Refer to the "Out of Formation" rules in the core rulebook.
- End of Activation (Edit)
- You cannot resolve two end-of-activation movement effects (refer to "End of Activation Movement" in the core rulebook). For EOA stuff that doesn't involve movement, though, it gets a bit more murky:
- Some EOA abilities explicitly state your activation ends as part of resolving the ability (like Reposition), and some don't (like Refuge).
- Whether it is explicit it or not, by definition an EOA ability is the last thing you can do for that activation. For instance, if you resolve Refuge and then continue your activation to cast more spells, then you have not used Refuge at the end of your activation.
- You cannot do an "at any time" ability during or after triggering an EOA ability; you cannot cast spells, purchase additional attacks, use a mini-feat, etc.
- If you start resolving an EOA movement (such as Reposition) then you cannot trigger abilities that occur "at any time" (such as Go To Ground). Because you can't trigger it while resolving the EOA movement, and after the EOA movement your activation has ended. (Infernal Ruling)
- For units: if any model in the unit starts resolving the unit's EOA movement, then no model in the unit can trigger an any-time ability. (Infernal Ruling)
- See also the training article: LPG - End of Activation.
|
|
|
Rules Clarification : Unarmed (Edit)
- Since this model has no weapons it does not have a melee range.
- This means it can't engage other models, declare charges, or make free strikes
- Also it can't gain abilities that require a melee range (such as Ragman granting this model Dark Shroud).
- However, other models that do have melee weapons can engage this model. So this model can still gain the "target in melee" shooting bonus.
|
|
|
Rules Clarification : Momentum (Edit)
- Huge-based models with Momentum don't get the +2" slam distance that normally applies when huge-based models slam smaller ones. Because that bonus movement only applies to a Slam Power Attack and Momentum is an effect of the weapon, not a Power Attack.
- Knockdown (Edit) - Remember, knockdown only prevents what it says it does. Refer to the Knockdown page for a recap of what a model can/can't do.
|
|
Rules Clarification: : Slam (Edit)
(Click Expand to read)
|
- General
- If you slam someone via a Power Attack the distance they move depends on relative base sizes.
- If you slam someone via a weapon or spell, the distance they move will be as per that weapon's/spell's rules text. Sometimes it doesn't depend on base size.
- Obstacles stop slams, but they don't stop throws.
- Obstructions stop both.
- If three models are B2B and in a triangle formation, and you slam one toward the other two, it will contact both those two models simultaneously. (Infernal Ruling)
- You can add model special rules (such as Gang) to the damage roll.
- Power Attack Slam
- You don't add any special rules on your model, unless it specifically refers to Power Attack Slam (such as Hard Head)
- You can use an "any time" ability after resolving the slam movement but before the slam attack roll. (Infernal Ruling)
- The range of a Power Attack Slam is irrespective of your weapon range:
- A Power Attack Slam made by a colossal or gargantuan has a 2˝ melee range.
- A Power Attack Slam made by any other model has a 0.5˝ melee range.
- You can boost the damage roll.
- Weapon Slam (ie Smite)
- You use the weapon's full P+S, not the attacker's base STR.
- You can add weapon special rules (such as Weapon Master) to the damage roll.
- You can boost the damage roll (and if you charged, it is auto-boosted).
- Dual Attack & Slam/Trample ( Edit )
- Power Attack Slam and Trample combine your Normal Movement and Combat Action, and how this works with Dual Attack is:
- Slam: You must resolve the movement, the attack, and moving the slammed model. Only then can you make initial ranged attacks.
- Trample: You must resolve the movement, the attacks, and the free strikes. Only then can you make initial ranged attacks.
- (Infernal Ruling)
- Incorporeal vs Slammed/Thrown models ( Edit )
- Incorporeal models cannot be moved by someone trying to slam them.
- Slammed models can move through Incorporeal models.
- If they have enough movement to get past them, no dramas.
- If they land on them, you move the Incorporeal model out of the way as per the Rule of Least Disturbance.
- If the Incorporeal model cannot be moved (i.e. it's a flag) then you move the slammed model out of the way, also by the rule of Least Disturbance.
- For the purposes of Collateral Damage, only the model(s) you contacted before you applied the rule of Least Disturbance count as contacted.
- The same logic applies to Throws.
- Collateral Damage
- Collateral damage cannot be boosted and is not considered damage from an attack or model. Refer page 33 of the 2021.08 version of the rules pdf. As a result:
- It doesn't trigger stuff that relies on being hit by an enemy (such as Shock Field) or damaged by an enemy (such as Vengeance).
- It doesn't get bonus damage from stuff that adds to a model's damage roll (such as Signs & Portents or Prey).
- It doesn't matter if the attacker has crippled weapon systems or aspects.
|
|
Rules Clarification : Single Shot - None yet. (Edit)
Rules Clarification : Carapace - None yet. (Edit)
Rules Clarification : Mobile Cover - None yet. (Edit)
Rules Clarification : Easy Target - None yet. (Edit)

|
Note to Editors
To edit the CA's tagged abilities, Click here
To edit the WA's tagged abilities, Click here
|
 Tough
Tough