| Mk4 has been announced, and we need to talk about what it means for the future of this website.
Please join the discussion either on the WMU Facebook Group or the Talk:Main Page area of this wiki.
|
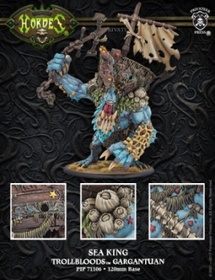
Eager to devour any who pass within reach of their webbed claws, the sea kings have heard Hoarluk Doomshaper’s call and ventured from the seas. Rising out of ancient legend to bring horror from the deep to the foes of the Trollbloods, these enormous marine beasts can easily smash a ship’s hull and devour its entire crew, leaving nothing but splintered timbers behind.
Basic Info
| Sea King |
| Missing Info |
|
|
| COST |
{{{cacost}}} |
| UNIT SIZE |
{{{casize}}} |
| FA |
{{{cafa}}} |
| Warcaster 0 |
| BASE |
Huge |
| SPD |
5 |
| STR |
15 |
| MAT |
6 |
| RAT |
5 |
| M.A. |
N/A |
| DEF |
9 |
| ARM |
19 |
| CMD |
N/A |
| ESSENCE |
{{{essence}}} |
| FOCUS |
N/A |
| FURY |
5 |
| THRS |
6 |
| HP |
54 |
| F. Field |
N/A |
|
|
|
|
| WJP |
{{{wjp}}} |
| WBP |
{{{wbp}}} |
| IHP |
{{{ihp}}} |
| FA |
2 |
| UNIT SIZE |
N/A |
| COST |
32 |
| N/A |
| N/A |
|
|
|
|
| N/A |
| Warcaster 1 |
| COST |
N/A |
| N/A |
Understanding
the Statblock |
|
Abilities
- Gargantuan - Gargantuans are mega-warbeasts, even bigger and stompier. They use nearly all the same rules as normal warbeasts but with a few alterations. These changes are summarized here or can be read in full here.
-
 Amphibious
-
 Pathfinder
- Bulldoze - When this model is B2B with an enemy model during its Normal Movement, it can push that model up to 2" directly away from it. A model can be pushed by Bulldoze only once per turn. Bulldoze has no effect when this model makes a trample power attack.
- Snacking - When this model boxes a living model with a melee attack, it can choose to RFP the boxed model. When it does, this model can remove d3 damage points.
Weapons
- Vomit Swarm - 10" range, 3" AOE, POW 13 gun
- Big Meaty Fist - 2" reach, P+S 19
- Anchor - 2" reach, P+S 20
Animus
|
|
COST
|
RNG
|
AOE
|
POW
|
DUR
|
OFF
|
|
|
|
|
| Vortex of the Deep
|
2
|
8
|
4
|
-
|
Round
|
Yes
|
|
| On a direct hit, push models within 2˝ of the model directly hit 2˝ directly toward it in the order you choose. This spell’s AOE is shallow water that remains in play for one round.
|
Theme Forces
Recent changes
2021.10
Thoughts on Sea King
Sea King in a nutshell
The Sea King is the third Trollblood gargantuan - and it has a threat range 2" longer than the other two for melee and it hits harder. His gun and animus are difficult to use but offer lots of control to the battlefield.
Combos & Synergies
- Get Rage on him if you really want to kill something dead.
- Mulg can animi cast by your warcaster.
- Earthborn Dire Trolls receive a defense buff from the puddles.
- Amphibious minions (and Swamp Trolls)an gain concealment from the puddles; Croak Trappers get stealth.
- Horgle The Anvil and Firestarter for a Vomit Swarm that sets things on fire too.
- Captain Gunnbjorn with Snipe sends the Vomit Swarm deep into enemy lines. His Guided Fire spell helps ensure a hit.
- Brigadier General Gunnbjorn lets it shoot up to 2 more times a turn and removes the blast damage from the initial attack.
- Dhunian Knot or any source of Puppet Master help score that critical knockdown on the anchor.
- It can be an excellent melee anchor (hehe) for Kriel Company lists, due to its 4" melee weapon it can hold down and clear zones. Also the fact that its melee range shrinks back to 2" outside of its activation can be abused with clever positioning so that your troops can shoot the a formerly engaged enemy without penalty during their activation.
- War Wagons really appreciate their fellow huge based big bro, since tough, steady, shield wall or iron zeal can stop their charges dead in their tracks. The Sea King can vomit such troops to death and free up charge lanes.
- Helga on Wheels - Cavalry, Battle Host and Rapport make the Sea King a happy pirate. MAT 11, RAT 6 and boosted charge attack rolls are a treat, as is a threat range of 14".
Drawbacks & Downsides
- The Sea King is a big and debuffable target.
- It really needs all its fury cleared off it. If your opponent messes with your fury management, you're going to have a bad time.
- Vortex of the Clock
- The AOE is put into play as shallow water before models are pushed, and it slows pushed models down as soon as they enter it, which makes it incredibly time-consuming to push models correctly.
- You have three options, you should discuss which one you're using with your opponent before the game begins:
- The correct way: For every model that is within 2" of the target, you have to measure how far they move until they touch the edge of the AOE, then work out how much of the 2" push they have left to complete, halve that number, and finish pushing them. - remember to account for pathfinder in your calculations.
- Push all models 2" (pretend the shallow water doesn't appear until after the pushes).
- Push all models 1" (pretend the shallow water is larger than it actually is).
Tricks & Tips
- Got an enemy sitting just out of charge range of your troops? Run a cheap model in front of them, cast Vortex of the Deep at your own model, and push the enemy into your unit's charge range.
- Just be careful you don't block your own charges with the cheap model.
- Gunnbjorn in Band of Heroes with the Sea King can provide an unexpected ranged option to the mainly melee force.
- With Snipe while the enemy is far away, the Sea King has a 19" threat on the initial impact, and up to an additional 6" with the second.
- Without snipe, the Sea King can pull off a charge, make a kill shot, and if Gunnbjorn cast Explosivo on the King, it can have a Remove From Play function on its gun.
- For some additional war beast support, the Swamp Troll can benefit from the Sea King's puddle and from Gunnbjorn's Guided Fire for another Remove From Play attack in addition to the warrior models' melee attacks.
- And since Gunnbjorn likes to bring Dozer & Smigg, drop Lucky Shot on the Sea King's AOE, for the +2 RAT and ability to re-roll the deviation.
Other
Trivia
- Released near the start of Mk3 (2016.12)
- The boat comes as seperate pieces, and there are no "blank sockets" on the King's back where it attaches, they're fully sculpted. This means you can leave the boat off the model and no one would know the difference.
Other Trollblood models
Rules Clarifications

|
Rules Clarification : Corrosion (Edit)
- If you deploy in corrosion hazard terrain (Acid Pool), then you get corroded before the game starts.
- Deploying a model in a hazard counts as being "put into play" in the hazard. Being put into play counts as "entering". When you enter a hazard, you trigger the hazard.
- A weapon can inflict continuous corrosion without itself being a corrosion damage weapon (for example, the Acidic Touch animus). In this case, the attack can hurt models with Immunity: Corrosion it just won't apply the continuous effect.
|
Rules Clarification : Poison - None yet. (Edit)
|
|
Rules Clarification : Scuttering Swarm (Edit)
- Additional AOE (Edit)
- The special rule states what the blast damage POW is - you don't need to halve it a second time.
- If the deviation distance is short and the AOEs end up overlapping a model, that model will take a damage roll for each AOE it's in.
- The distance of the second deviation is a d6 roll, unless the rule on the card specifies otherwise (Infernal Ruling).
- If you have an ability to reroll deviation (such as Artillerist) then you can reroll each additional AOE independent of the others.
- If the deviation direction of the additional AOEs is limited (such as Bounce) then the direction of the reroll is limited too. (Infernal Ruling)
- The additional AOEs are treated as if they "came from the weapon" exactly the same as the first AOE.
|
|
|
Rules Clarification : Open Fist (aka, Power Attack Throw) (Edit)
- Throw ( Edit )
- See also the Throw article for a recap of the core Throw rules.
- If a model is somehow thrown at itself (which can happen with Durst1's feat) it would not move, it would be knocked down, and it would take a standard power attack damage roll but it would not take an additional die for colliding with itself. (Infernal Ruling)
- Because you move the target model between the attack roll and the damage roll, you can get different buffs applied to the two rolls. For instance, if you throw the target in or out of a Flanking model's melee range.
- Incorporeal vs Slammed/Thrown models ( Edit )
- Incorporeal models cannot be moved by someone trying to slam them.
- Slammed models can move through Incorporeal models.
- If they have enough movement to get past them, no dramas.
- If they land on them, you move the Incorporeal model out of the way as per the Rule of Least Disturbance.
- If the Incorporeal model cannot be moved (i.e. it's a flag) then you move the slammed model out of the way, also by the rule of Least Disturbance.
- For the purposes of Collateral Damage, only the model(s) you contacted before you applied the rule of Least Disturbance count as contacted.
- The same logic applies to Throws.
- Collateral Damage
- Collateral damage cannot be boosted and is not considered damage from an attack or model. Refer page 33 of the 2021.08 version of the rules pdf. As a result:
- It doesn't trigger stuff that relies on being hit by an enemy (such as Shock Field) or damaged by an enemy (such as Vengeance).
- It doesn't get bonus damage from stuff that adds to a model's damage roll (such as Signs & Portents or Prey).
- It doesn't matter if the attacker has crippled weapon systems or aspects.
- Throw - Power Attack
- When you make a Throw Power Attack, no other abilities of the Fist weapon (such as Chain Strike) are applied unless they specifically mention Throws. (Locked Thread)
- If you do a Power Attack Throw and you choose to throw the target directly away, no deviation is rolled to determine the final position of the model. (Locked thread)
- A model that cannot be targeted by melee attacks (such as Una2's feat) cannot have models thrown at them, either. (Infernal Ruling)
- Since throwing Model [A] at Model [B] involves making a melee attack roll vs Model [B] which is out of your melee range, it technically breaks a whole bunch of core rules. (Infernal Checking)
- Even though you make a "melee attack roll" vs Model [B] you don't actually make a melee attack vs it. Also, the damage it suffers is from Collateral damage, not from the original attack. So you can't trigger stuff like Snacking from damage you did to Model B.
|
Rules Clarification : Chain Weapon - None yet. (Edit)
|
|
Rules Clarification : Chain Strike and/or Lunge (Edit)
- The extra melee range kicks in the instant you start your activation, and if that makes you engage an enemy then it means you can't aim.
- The extra range does apply during Frenzies (because that is defined as an activation)
- The extra range doesn't apply during free strikes or when your opponent takes control of your model.
- It doesn't increase the range of Power Attacks, because you do not apply weapon special rules to Power Attacks (unless they specifically reference Power Attacks, like Hard Head does). (Locked Thread)
- If you're affected by another range-altering rule (such as Jakes2's feat) then that won't override Chain Strike. (Infernal Ruling)
|
|
|
Rules Clarification : Knockdown (Edit)
- Knockdown (Edit) - Remember, knockdown only prevents what it says it does. Refer to the Knockdown page for a recap of what a model can/can't do.
|
|
|
Rules Clarification : Gargantuan (Edit)
- Warroom
- 2017 bug: Gargantuan's have their animus labelled as "spells". Despite this, it's an animus and as such the warlock can cast it. This is a known bug. (Staff Comment)
- 2020 bug: The animus doesn't show up at all. You'll have to go to the official card database instead.
- Refer to the Gargantuan article for a recap of their rules.
Huge Base (Edit)
- But this bonus doesn't apply to slams triggered by normal attacks (such as Critical Smite or the Hurricane's Thunder Charge ability).
Also, simply being on a huge base triggers a bunch of rules scattered throughout the rulebook, click to read them. [Show/Hide]
From the 2020.02 edition of the core rules (Edit)
- Fields of Fire
- Page 37 A huge-based model’s front arc is marked on its base. Its front arc is further divided into two 90° fields of fire. These fields of fire determine which models a huge-based model can target with its weapons, depending on the location of those weapons. Weapons located on a huge-based model’s left side (L) can be used to target only models in its left field of fire, and weapons located on its right side (R) can be used to target only models in its right field of fire. Weapons with locations “S,” “H,” or “—” can be used to target models in either field of fire. If any part of a model’s base is on the line separating the left and right fields of fire, the model is considered to be in both fields of fire.
- Concealment, Cover, LOS
- Page 49 Concealment & Cover - Huge-based models never gain the DEF bonuses from concealment or cover.
- Page 60 Clouds - Cloud effects do not block line of sight to huge-based models.
- Page 87 Forests - Forests do not block line of sight to huge-based models.
- Huge-Based models in melee
- Page 54 - Huge-based models never gain the Target in Melee DEF bonus.
- Page 65 - Combined Ranged Attacks cannot target a model in melee unless it has a huge base.
|
Rules Clarification : Amphibious - None yet. (Edit)
|
|
Rules Clarification: : Bulldoze (Edit)
(Click Expand to read)
|
.png) (A) People think Bulldoze works like a bowling ball hitting tenpins. But this is wrong because the models haven't been moved DIRECTLY away. .png/300px-Bulldoze_(B).png) (B) Whereas if you move models DIRECTLY away, you bulldoze the first guy okay, but then the next one's path is blocked (shown in red), and you get stuck. Bulldoze - General
- Models are pushed directly away from you at the point of contact. Some players do this incorrectly, refer to the section on moving models, below.
- You cannot cast spells or use any other "any time" abilities when you 'stop' to resolve the Bulldoze movement. It's just a pause, not a stop.
- The size of the Bulldozer vs the Bulldozed does not matter. A small model bulldozes a large model just fine. (Just don't expect to move a Colossal etc.)
- Bulldoze only works during your Normal Movement. This includes full advances, runs, charges, and slams, but doesn't include stuff like Reposition or Energizer.
- You can't make free strikes against models you Bulldoze (because for them it is involuntary movement).
- Enemy models with 2" melee range will still engage you after being bulldozed. Because they will be exactly 2" away and thus still within 2".
- An enemy model can only be pushed once by the Bulldozer, but if you have multiple Bulldozer models then you could push the same enemy multiple times.
- If you contact a model you want to Bulldoze while overlapping another model or an obstacle, then you can "pause" on top of that other model/obstacle while resolving the Bulldoze, then continue your movement off the other model/obstacle. (Locked thread)
Bulldoze - Charges / Slams
- If you attempt to Bulldoze a model out of your charge lane but it does not move far enough, you can't Bulldoze again. You will continue your charge, contact it again, and stop.
- You can use Bulldoze to get the charge bonus against models between 1 and 3" away. Simply move into B2B, bulldoze them 2" to make some more room, then you can move 2" further forward to get to the "moved at least 3 inches" requirement.
- Similarly for Slams vs models within 1-3".
- If you Bulldoze your charge target out of your melee range, this doesn't break the "once in your melee range the target must stay in your melee range" rule. Bulldoze is an exception. (Infernal Ruling)
Bulldoze - Moving the models
A lot of people think they can bulldoze straight through the enemy lines, like shown on Image A. But what actually happens is more like Image B. This is due to 3 important factors you need to apply:
- Bulldoze pushes models directly away from your base. Not at an angle. Directly. Away.
- If there is a model behind the bulldozed model, the model will STOP.
- And in this situation, a model beside the pushed model is effectively behind it unless you're pushing at a perfect tangent.
- A model can be pushed only one time via Bulldoze.
-
Push - General ( Edit) [Show/Hide]
- Pushed models do not change their facing.
- Pushed models move at half rate through difficult terrain. Also, Pathfinder doesn't apply during pushes.
- Pushed models stop if they contact anything - a model of any size, or any obstacles or obstructions.
- You don't get free strikes against pushed models, because it is "involuntary movement" and therefore does not count as an advance.
- Pushed models suffer the effects of anything they move through (such as acid clouds).
- If you use a Push vs a charging model (via a free strike for example), this will stop the charge movement (refer core rulebook).
- However, if the pushed model is in melee range of its charge target after the push, then it is considered a successful charge. (Infernal Ruling)
- In that scenario, you measure whether the charging model moved 3" or less excluding the push distance. (Infernal Ruling)
- If you push a model to a position where it regains Incorporeal (for instance you push it out of range of an Exorcist) then what happens is (Being Checked by Infernals)
|
|
|
Rules Clarification : Snacking (Edit)
- You can use Snacking to RFP your target even if you're at full health. (Locked thread)
- Snacking occurs at boxed, and thus:
- Doesn't prevent abilities that trigger at disabled (such as Tough, Self-Sacrifice, etc).
- Might prevent abilities that trigger at boxed, depending on who the active player is and whose model the ability triggered on. Refer the 'Triggers' section (pg 10 of the pdf)
- Does prevent abilties that trigger at destroyed (such as collecting soul tokens, etc)
- You can snack friendly models.
- You may choose where each individual point of healing goes.
- If you kill multiple models with a single attack (such as trampling over them) then you get to heal once for each model killed.
|
|
|
Rules Clarification : Vortex of the Deep (Edit)
- The AOE enters play as shallow water before the models are pushed, so models will be pushed at "half speed".
- But, because the target model base size plus 2" is larger than the AOE, that means part of the push movement is at normal speed and part is at halved speed.
For each model that gets pushed, you are supposed to measure how much distance is between their original position and the edge of the AOE, then subtract that to work out how much of the 2" push they have left, then halve that and finish the push into the AOE.
Have fun with that!
- (Locked thread)
-
Push - General ( Edit) [Show/Hide]
- Pushed models do not change their facing.
- Pushed models move at half rate through difficult terrain. Also, Pathfinder doesn't apply during pushes.
- Pushed models stop if they contact anything - a model of any size, or any obstacles or obstructions.
- You don't get free strikes against pushed models, because it is "involuntary movement" and therefore does not count as an advance.
- Pushed models suffer the effects of anything they move through (such as acid clouds).
- If you use a Push vs a charging model (via a free strike for example), this will stop the charge movement (refer core rulebook).
- However, if the pushed model is in melee range of its charge target after the push, then it is considered a successful charge. (Infernal Ruling)
- In that scenario, you measure whether the charging model moved 3" or less excluding the push distance. (Infernal Ruling)
- If you push a model to a position where it regains Incorporeal (for instance you push it out of range of an Exorcist) then what happens is (Being Checked by Infernals)
|
 Continuous Corrosion
 Chain Weapon